User settings
-
Permission overview for each user role
Not sure which parts of the application your users have access to according to their user roles? Take a look at our overview.👇
In Sloneek, you can assign several user roles to users. To help you better understand which role has which permissions to access different modules in the application, here is an overview of them. To help you navigate the article, use the contents below:
Content:
Roles related to certain modules
Regular user
The default role that every new Sloneek user has. In a simplistic way, a regular user can only see themselves in most cases, but here is a detailed description of their permissions for each module:
Absence
- A regular user can only see their vacation balances and other absences, they cannot see the balances of others.
- In the calendar and on the dashboard, they can view the specified absences of either all colleagues in the company or only colleagues in their team. This setup depends on the company's general account settings.
- Obviously, a regular user can only enter absences for themselves.
Activities
- A regular user can only see the total reported work through activities for themselves in their profile, they cannot see the totals of other users.
- In calendars, the same applies as for absences: a regular user can view the entered activities of either all colleagues in the company or only colleagues in their team. This setup again depends on the company's general account settings.
- Obviously, a regular user can only enter activities for themselves.
Arrivals and departures
- A regular user can only see their own arrivals and departures in the calendar, they cannot see the attendance of other users.
- The same is true for the total time worked by arrivals and departures, the regular user only sees their totals.
- Obviously, a regular user can only enter arrivals and departures for themselves.
Personal and work data of other users
- In the Colleagues section, a regular user can see all their colleagues in the company. However, if they click on the detail of one of them, they can only see the basic work and contact details of the colleague. These include: first name, last name, email, phone number, user's public description, work location and country of operation.
- The regular user will not see the type of contract, remuneration or other sensitive data.
Organisational structure
- A regular user has access to the team tree (company's organizational structure), if the company's general account settings allow it. Administrators can prevent normal users from accessing the Teams section in these settings.
Assets and Documents
- For both modules, a regular user can only see their own documents and assets, not those of other users.
Tasks (onboarding checklists)
- Also for tasks, the regular user can only see their tasks (those they are responsible for), not those of other users.
Evaluation
- A regular user can only access their own evaluation, they cannot see the evaluation of other users.
- If a user has been assigned a team objective or key results for that objective, the regular user can see the names of the other users with whom they are working on the objective and who are responsible for that objective or key results.
Surveys
- Regular user has access to complete surveys that are relevant to them. These can be found in the My Surveys section.
- Naturally, a regular user cannot see the results of the surveys or how other users have responded.
Company wiki
- A regular user has access to the company wiki, but does not have rights to edit articles. They can only read them.
Trust box
- A regular user has access to the trustbox unless the administrators choose to hide it in the company's general account settings.
Reports
- A simple rule applies to the entire reports section: A regular user can only generate and view their own reports; they cannot see other users' reports.
Audit log
- A regular user can only access their personal audit log, which they can find in his profile.
- In this audit log they can see all the actions that concern their person.
Team manager
You can assign the role of team manager to a user in the Company / Teams section by clicking on the details of a specific team. Simply put, a team manager can see themselves and their team, which they can also continue to work with. Here is a detailed description of his permissions for each module:
Absence
- The team manager can see their vacation balances or other absences and at the same time they can also see the balances of their team members.
- In the calendar and on the dashboard, they can view the specified absences of either all colleagues in the company or only their teammates. This setup depends on the company's general account settings.
- The team manager can also enter absences for their team members.
Activities
- The team manager can see the total work reported through activities for themselves, while also having a view of the totals for other members of their team in their folder.
- The same applies in calendars as for absences: the team manager can view the entered activities of either all colleagues in the company, or only colleagues in their team. Again, this setup depends on the company's general account settings.
- The team manager can also schedule activities for their team members.
Arrivals and departures
- The team manager can see their arrivals and departures in the calendar, as well as the attendance of other members of their team.
- The team manager can also edit and enter the attendance of their team members, but they cannot delete events!
Personal and work data of other users
- In the Colleagues section, the team manager can view all of their colleagues in the company. If they click on the detail of their team member, they can view their work data, remuneration, absence and activity overview, evaluation and user history.
Note: You can set whether the team manager has the right to view and edit remuneration of their team members in the manager's user folder.
- For other users outside of their team, the team manager will only see basic work and contact information for the colleague. These include: first name, last name, email, phone number, public description, work location, and country of operation.
Organisational structure
- The team manager has access to the team tree (company's organizational structure), if the company's general account settings allow it. Administrators can prevent users from accessing the Teams section in this setting.
Assets and Documents
- For both modules, a team manager can only see their own documents and assets, not those of other users, not even members of their team.
Tasks (onboarding checklists)
- Also for tasks, the team manager sees only their tasks (those they are responsible for), not those of other users.
Evaluation
- The team manager has access to their evaluation and can also enter and edit the evaluation of their subordinates in their folders.
- The team manager also has access to the Evaluation module in the Company section, where they can create team objectives and key results for them and track their achievement.
Surveys
- Team manager has access to complete surveys that are relevant to them. These can be found in the My Surveys section.
- The team manager does not see the results of the surveys or how other users responded, even members of their team.
Recruitment (ATS)
- The team manager has access to the Recruitment module in the Company section, where they can view those positions that fall under their team. They can also add comments on these jobs for candidates.
Company wiki
- The team manager has access to the company wiki, but does not have rights to edit articles. They can only read them.
Trust box
- The team manager has access to the trustbox unless the administrators choose to hide it in the company's general account settings.
Reports
- A simple rule applies to the entire reports section: A team manager can generate and view reports for themselves or their subordinates, they cannot see other users' reports.
Audit log
- A regular user can only access their personal audit log, which they can find in his profile.
- In this audit log they can see all the actions that concern their person.
Administrator
Only the account owner can add or remove the administrator role from a user. Simply put, the administrator has access to the complex administration of the entire application and can see all the data. However, here is a detailed description of his/her powers for each module:
Absence
- The administrator can see their vacation balances or other absences and can also see the balances of all other users.
- The administrator can also enter absences for any other user in the system.
- At the same time, it is the administrator who creates and sets up new absences, assigns them to users to use and manages their entitlements.
Activities
- The administrator can see the total work reported through activities for themselves, and at the same time also has a view of the totals for all other users in their folders.
- The administrator can also schedule activities for any other user in the system.
- At the same time, it is the administrator who creates and sets up new activities, assigns them to users to record, and manages their details.
Arrivals and departures
- The administrator can see their arrivals and departures in the calendar, as well as the attendance of all other users of the system.
- The administrator can also retrospectively enter, edit and delete the attendance of all other users.
- At the same time, it is the administrator who creates and sets the departure types for attendance, work locations, sets terminals and attendance cards.
Personal and work data of other users
- Naturally, the administrator has access to the administration of all users of the system. Specifically from the Users / Management section.
- In the user folders they can not only see all data and all available tabs, but also edit them.
- The administrator can also add special roles to other users such as Document Manager or Ombudsman. The only exception is the admin role, which can only be added or removed by the account owner.
Organisational structure
- In the Company / Teams section, the administrator creates and manages the organizational structure of the company or the team tree.
- The administrator creates and sets up individual teams and adds users to them, including their team roles.
Assets
- The administrator has unlimited access to the Assets module. They can create, import and set up individual assets, assign them to users or bulk export them from the system.
Documents
- The administrator has unlimited access to the Documents module. They can upload and manage contracts, private documents and company-wide documents, monitor their signatures and read status or create document templates.
Tasks (onboarding checklists)
- The administrator has unlimited access to the Onboarding module. They can create new onboarding templates (checklists) of tasks, for which they designate responsible persons for their execution and deadline. At the same time, the administrator can monitor the status of individual tasks.
Evaluation
- The administrator has unlimited access to the Evaluation module. They can create evaluation questionnaires and competency models, assign team and personal objectives to users and monitor their progress.
- The administrator also assigns the created evaluation questionnaires and competency models to users in their folder, where they also have a detailed view of the user's entire evaluation.
Surveys
- The administrator has full access to the Surveys module, where they can create, duplicate or delete surveys.
- At the same time, the administrator can access the results and download graphs.
Recruitment (ATS)
- The administrator has unlimited access to the Recruitment module. They can create, publish and share new job postings, set up the recruitment process, manage candidates and talent pool and of course create email templates.
Company wiki
- The administrator manages the company wiki. They create and publish articles, which can also be pinned to the main dashboard.
Trust box
- The administrator has access to anonymous messages in the trust box, unless another user is assigned the role of Ombudsman. In this case, the trust box is the sole responsibility of the Ombudsman.
Reports
- A simple rule applies to the entire reports section: An administrator can generate and display reports for themselves and all other users of the system.
Audit log
- The administrator has access to the company audit log, which can be found in the Settings / Audit log section.
- In this audit log all actions performed in the system by all users. The audit log therefore serves as a bulletproof record in case of doubt.
Account Owner
Each Sloneek account can only have one account owner. The difference between the administrators and the account owner is that the account owner can name other users administrators and can request a deletion of the whole account.
Special user roles and their permissions
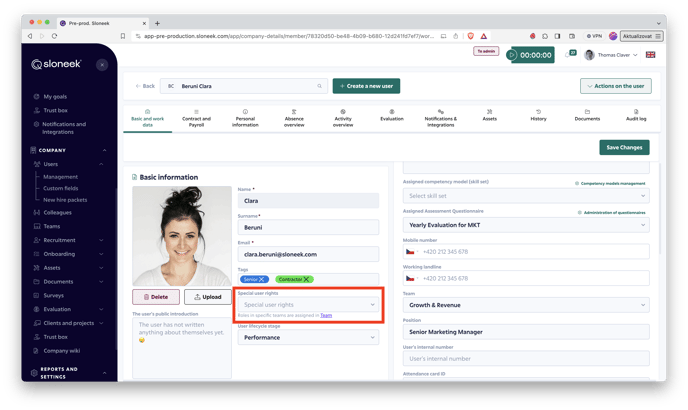
In addition to the default role of a regular user, team manager and administrator (and also account owner, whose permissions are practically identical to those of an administrator), Sloneek offers users to add several special roles with special permissions. These are added in each user's folder in the Special user rights field.
Document manager
- As the name suggests, a user with this role has full access to the Documents module.
- Similar to an administrator, they can upload and manage contracts, private documents, and company-wide documents, monitor their signature and read status, or create document templates.
Asset manager
- As the name suggests, a user with this role has full access to the Assets module.
- Similar to an administrator, they can create, import and set up individual assets, assign them to users or bulk export them from the system.
Recruiting manager (ATS)
- A user with the Recruiting Manager (ATS) role has full access to the Recruiting module.
- Similar to an administrator, they can create, publish and share new job postings, set up the recruitment process, manage candidates and talent pool, and of course create email templates.
Clients and Projects manager
- A user with this role has full access to the Clients and Projects section where they can create and manage individual projects and clients.
Please note: The Clients and Projects Manager does not have approval rights related to reporting work on activities, projects and clients. They also cannot create reports in reports for users working on specified projects and clients. For this purpose, it is necessary to designate a Project Manager for each project.Full access to reports
- As the name suggests, a user with this role has full access to reports.
- This can be useful if, for example, you want to grant access to reports to your accountants so that they can download payroll documents.
Evaluation Manager
- A user with this role has full access to the Evaluation module where they can create and manage evaluation questionnaires, skill sets or objectives.
- At the same time, the evaluation manager has a view of all users' evaluations, and can complete, edit or close these evaluations.
Ombudsman
- A user with this role is responsible for the trust box.
- If a user leaves a message in the trustbox, it is only the user with the ombudsman role who can access it.
Team roles modifying permissions
Another category in Sloneek is team roles that modify certain permissions within teams. Here is an overview of the team roles that are assigned in the Company / Teams section when you click on the details of a particular team:
Supervisor
- Allows user to view the status of events of subordinate teams without the capabilities of the team manager role.
- This is read-only access, not edit and write access (for example, previewing reports and calendar, without the ability to change anything).
- The supervisor also cannot approve absences or activities. At the same time, a user with the Supervisor role can see the team in which they are a supervisor in the reports.
Activity planner
- Allows user to enter events in the Activities Calendar on behalf of users in teams where a user with this role is assigned as an Activity Planner.
- The activity planner does not have approval rights and approval of activities is subject to the team manager.
- The activity planner cannot generate reports for other users.
Absence planner
- Similar role to the Activity Planner above, but for the Absence module.
- Allows user to enter events into the Absence Calendar on behalf of users on teams where a user with this role as Absence Planner is assigned.
- The absence planner does not have approval rights and approval of absences is subject to the team manager.
- The absence planner cannot generate reports for other users.
Absence approver
- The difference from the Absence Planner is that a user with this role has access to the Approvals section.
- A user with this role approves or rejects absences for the team in which this role is assigned. These users also receive notifications of requests related to absences that are entered or canceled.
- Note: This role does not have access to reports.
Arrivals and departures manager
- A user with this role can retroactively edit and manage attendance for other team members.
- Note: A user with this role cannot delete the entered attendance events, these rights belong only to administrators.
Roles related to certain modules
The last category of roles are related only to certain modules in which users have limited access to the module.
Project manager
- This is not a role directly associated with teams, so this role is not assigned in Teams, but for a specific project.
- A user with this role can then approve the activities reported for that project and has access to reports on the projects they manage.
- A user with this role cannot create own projects or clients
Hiring manager
-
The Project Manager role is related to the ATS module, where you can assign this role to certain users for a selected job posting so that they can view the position and work with the applicants
-
A user with this role has only preview rights and cannot change the settings of the entire module or create own job offers
-
Assigned absence events
For each user, you set individually in the User card (Users / User's list, click on user) / Absence overview after click on button Show settings for absences and annual funds . The menu automatically displays all event dials that are active. It is also necessary to set whether the event should be subject to the approval of its manager. This can be set by clicking on the checkbox in the next column titled "Approval Required".
In case of absences, this setting can be done in bulk in Company settings / Bulk setting of absences. In the same place, you can also adjust balances or individual event funds in bulk.
Explanation of individual terms
- Fund size - is defined directly in the dial. From there, it can be changed on a global level for all users who have this absence event enabled for drawdown.
WARNING: If you change the dial size, this will also change the historical records in the reports, which may subsequently not correspond to the historical reality! If you are changing the absence pool after a long period of time, consider whether it would be more efficient to create a new event/dial.
- Individual fund - Only if the event has a fund. If a value is set here, the user's entitlement is not governed by the value in the dial, but the dial entitlement is overwritten by that value. Typically this is a situation where some users have 5 more vacation days than others. In this case, if the definition in the Leave Dial is 20, the Individual Pool will be equal to 25 for people with a higher pool.
- Fund for the first year - Again, only if the event has a fund. In a situation where an employee starts during the year, they are not entitled to the full leave pool (usually not even sick days, sick hours, etc.) but only a pro-rated portion. This needs to be calculated in the payroll system and then entered here.
- Exhausted - This value is editable for all event types (with and without pool) and indicates how many units from the pool the user has exhausted this year. This is a setting, not a report! Thus, here you are determining how many units to have depleted beyond the events that are entered in the absence event calendar.
Example: in a situation where you as a company have joined Sloneek during the year, and your employees have already exhausted some events by that time. In this case, you have two options. Either you enter all the events they have exhausted via the calendar (i.e. de facto enter the events backwards), or you are content with just entering in this column how much they have already exhausted. The first option is time consuming, but will give you information about the drawdown of all events in a yearly view, the second option is fast, but you have to take into account that in the first part of the year, when you as a company have not used Sloneek yet, the events are not in the calendar. We almost always recommend the faster option to our customers.
- Transferred from last year - at the end of the year, Sloneek carries over unused units to the next year. Any units that have not been used up and also have a fund, and at the same time the option "Unused units carry over to next year" is marked in the absence event settings, will be entered in this column. So if you as a company are accessing Sloneek, and your employees at that time still have some unused leave from last year, enter the value of that pool here.
-
User tags
Add user tags for an easy filtering of information.
You create and edit tags directly in the user folders in the Tags field. Here you have the option to either assign existing tags or create completely new tags.
Use the tags for faster-advanced filtering and searching not only in the user list, but also in reports.
-
Salary / remuneration settings
Track all the wages including bonuses and deductions.
You can make individualised settings in the User Folder in the Contract and Payroll tab. From here you can add a new basic salary or edit an existing one, add deductions or bonuses for users.
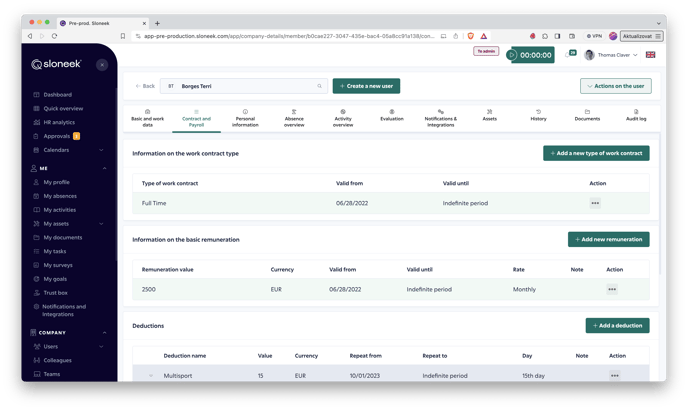

The set basic salary, deductions from salary and bonuses are also recorded in the Reports (Reports / Other / Salary).
If, for example, you do not delete the previous payroll when increasing the salary, you can subsequently monitor the development of the user's salary over time in the reports.
Setting up recurring bonuses and deductions
Many companies provide "bonuses" or deductions on a regular/monthly basis. For example, a Sports / Benefit card is something that employees are given every month.
You can set up bonuses and deductions as recurring. The admin sets how often the deduction/bonus should recur for that user and on which date it should recur and it will automatically appear on the user's card on that day.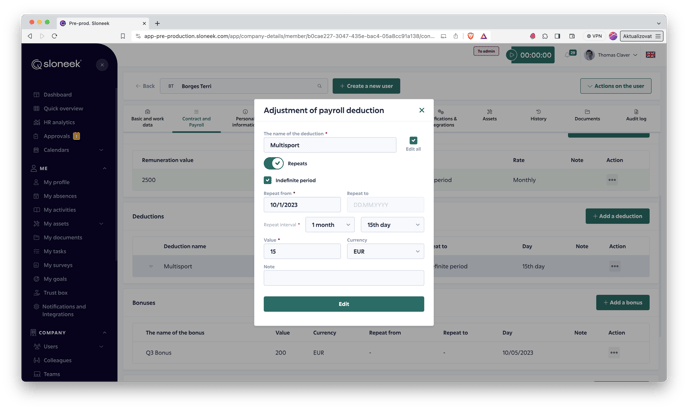
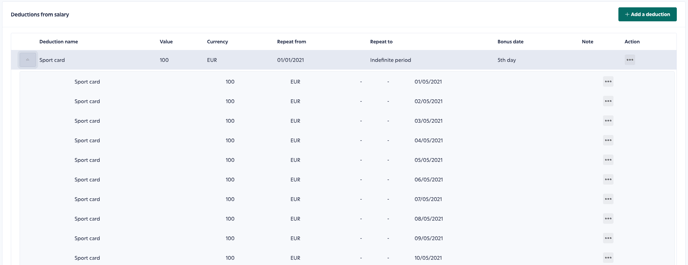
The entire history of a given item is then hidden behind a single line and of course written into the appropriate reports.
Editing and viewing remuneration by team managers
f you want Team managers to have the ability to edit the basic financial terms, bonuses and deductions, you must enable this option.
In the User Folder / Basic and work data you will find a checkbox Manager can edit remuneration. Check this box to determine if this user can view and edit financial information (base, bonuses, deductions).
A condition for displaying the checkbox is that the user is assigned as a Team Manager in the team.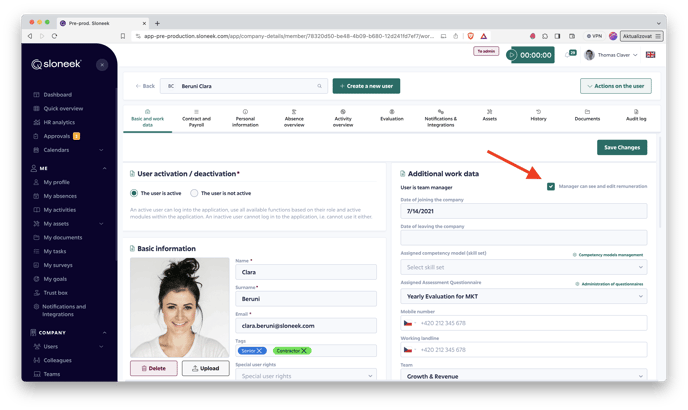
-
Locations settings and GPS logging
Setting up locations to record arrivals and departures allows you to check attendance at a specific location.👇Locations can be set by a user with Administrator permission in Settings / Locations.
Locations are physical addresses that are paired with attendance events. If a user enters an arrival or departure within the geographic radius defined in a location, the attendance event is assigned to that location. In the reporting of attendance events, it appears as the name of the location (e.g. Office Prague). If the user logs into the system at a location that does not match the locations entered in Sloneek, it will appear in the report as "off-site" identification.
When determining the tolerance radius ( a radius of meters away from the exact address of the location), take into account the expected internet and GPS signal coverage. In densely populated areas 100 m will be sufficient, in areas with lower coverage add at least 300 m.
The app needs user consent to access GPS location for proper functionality.
In any case, the application does not track the user's movements, it only records the user's location at the moment of checking in or out for work as part of the company attendance.
 Go to the article on setting arrivals and departures.
 -
User roles
Each Sloneek user can have roles depending on the activities, access and rights they have within the application.
The setting of user roles takes place on the user tab. If you are interested in the detailed permissions for each of the user roles, you can find a description in this article.
Primary role
- Regular User - Each user has this role, which, among other things, provides access to the application through the user interface. They can only see their own data in reports. In calendars, they can see their own and their team's events.
- Team Manager - The user assigned to a team as its manager is then able to view team data (calendars, reports including payroll) and individual data on the team member's card (work data, salary, evaluation, absence overview, activity overview and assets), which can be accessed via Company / Colleagues.
ATTENTION, the team manager cannot see documents stored under a specific user.
- In the Attendance module, they can edit the attendance of their team members. Without assigning a user with this role to specific teams, the role has no effect on the user's rights. The Team Manager role is assigned automatically when a user is assigned to a team.
Unless a manager role is assigned to a team, all event approval requests will go to all users with the ADMIN role.
- Supervisor - Allows you to view the event status of subordinate teams without the capabilities of the Manager role. This is read-only access, not edit and write access (for example, previewing reports and calendars, without the ability to change anything). The supervisor also cannot approve absences or activities. At the same time, a user with the Supervisor role can see the team in which they are a supervisor in the reports.
- Administrator - Admin access has full permissions for all actions over all data of all users. This role therefore allows complete access - reading and writing all application settings, events, utilities, etc. We strongly recommend keeping the number of administrators as low as possible.
FAQ: How do I add another administrator?
The Administrator role can only be assigned and removed by a user with the OWNER role.
-
Account Owner - This is the same set of permissions as Admin access, but with two differences:
- Account Owner can SAVE the entire account,
- Assigns the Admin role.
Special user rights
The user role can be supplemented with special user rights with access to specific functionalities.
- Full access to reporting - This role is used for unrestricted access to all reports for all users.
- Assets Administrator - The Assets Administrator has full rights to work with the property. He can therefore create, edit, delete and assign them to users.
- Document Manager - The Document Manager allows full administrator access to the Documents module.
- Recruiting manager - Creates, approves and sets up new recruitment activities.
- Project and Client Manager - creates and sets up Projects and Clients within the Activities module
- Evaluation Manager - has full access to the Evaluation module where they can create evaluation questionnaires, competency models or objectives. At the same time, they can view and edit the evaluation of all users.
- Ombudsman - following the European Whistleblowing Directive, by assigning a role you indicate those users who will have exclusive access to messages in the trust box.
If the Ombudsman role is assigned to at least one user, no one else (neither Admin nor Account Owner) will have access to messages in the trust box!
Team roles
Assignments in the team settings create automatically assigned roles, similar to team managers:
- Activity planner - Allows the Time tracking module to enter events in the activity calendar on behalf of users in teams where a user with this role is assigned as Activity planner. Activities entered this way, if they are subject to supervisor approval according to their settings, go to the user's manager for approval after being entered by the Planner. This role is therefore useful in situations where the users themselves cannot or do not know how to enter their own activities into the calendar.
- Absence planner - A role similar to the Activity planner, but applicable to the Absence module. That is, entering absence events into the calendar on behalf of other users.
- Absence approvers - the role allows access to Approvals. A user with this role approves/disapproves absences for the team in which this role is assigned. These users also receive notifications of requests related to absences entered / cancelled. This role does NOT come with access to reports!
- Arrivals and Departures manager - A user with this role can add and manage attendance segments to other team members.
WARNING: After activating the Absence planner, Activity planner and Arrivals and Departures Manager roles, users must be assigned to a team structure (Settings / Teams) to use these roles.
Project related roles
- Project manager: for a specific project (in its details) you can also specify who will be the project manager of the selected project. The user with this role can then approve the activities reported for this project and has access to reports on the projects they manage. A user with this role, on the other hand, cannot create other projects or clients.
Recruitment related roles
- Hiring manager: you can specify who will be the hiring manager for a specific job offer (when you create it). The user with this role can then view, rate and comment on the candidates applying for the job or download their CVs. A user with this role, on the other hand, cannot change recruitment settings or create new offers.
-
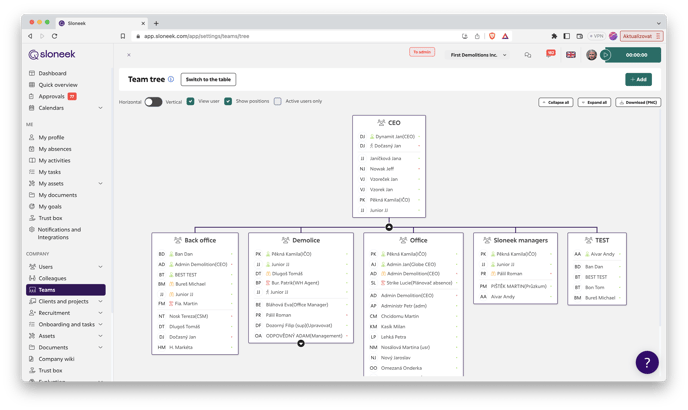
Teams and organizational structure
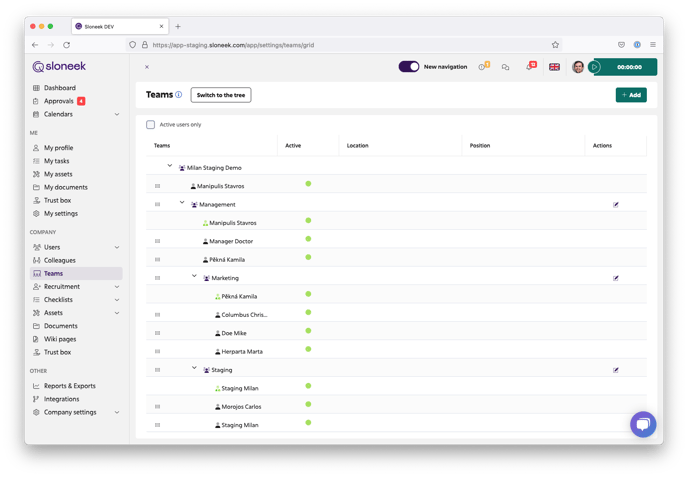
All users can be sorted into teams and grouped into an organizational chart.
You can create new teams and organizational structure in Company / Teams.
All users can be freely sorted into teams and grouped into an organizational chart. This can of course also be exported. To move users, simply do a drag n' drop in the table view - that is, grab and simply move them elsewhere.
Adding a new team
To add a new team, click
/Add%20button.png?width=50&height=28&name=Add%20button.png) button.
button.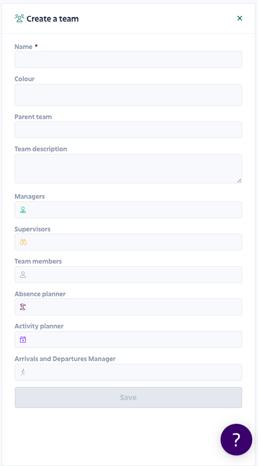
Each team has a Manager role who approves absence events for the team. You can use Supervisor role who only looks at the events and activities of the team. You can also add additional secondary roles.
If there is no manager role assigned to the team, all event approval requests will go to all users with the ADMIN role. Detailed description of all Roles read here.
To enrich the information you can add a description to the teams. Any user can then click on the team and read this description about the team. Adding/editing the description can be done when creating a new team and editing existing teams.
To edit an already created team, click on the team box in the structure and open the edit by clicking/Edit%20button.png?width=20&height=23&name=Edit%20button.png) button.
button.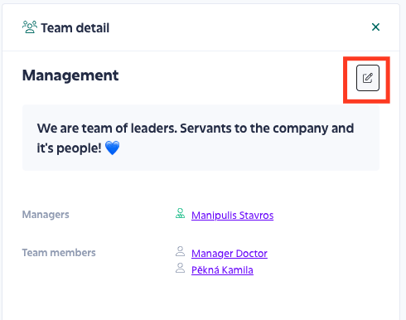
If you click the Expand all button, the team tree will remain expanded even after you have made changes to the teams.
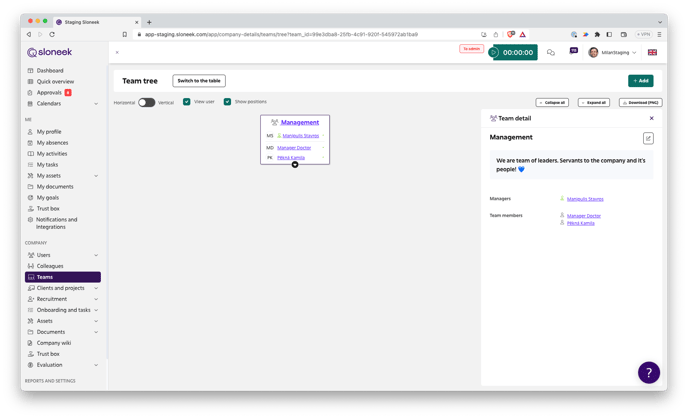
Description and detail of the teams
To enrich the information you can add a description to the teams. This can be done when creating a new team and editing existing teams. Any user who clicks on a given team can then read this description about the team.
Editing the team label can be done by clicking on the team box.
FAQ: Where can I find my manager (supervisor)? How do I find out who my manager (supervisor) is?
Every user can also quickly see who is their manager (superior or leader) in this organizational chart.
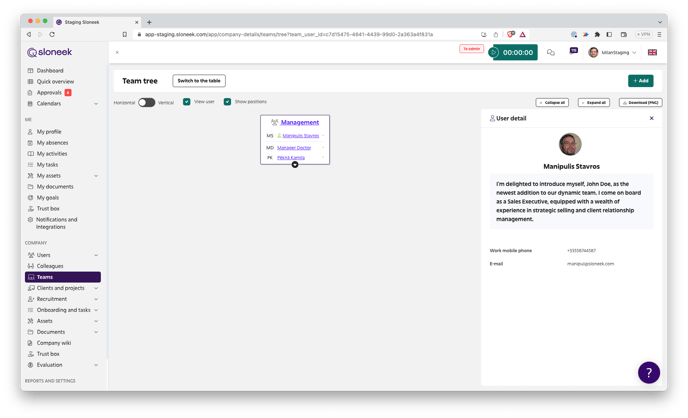
Viewing user details
This works similarly when you click on any of the users in a given team. We've linked the details to the user cards, so the contact details and the user's public description (if filled in the User folder) are displayed here. You can also easily click through to the user's card from here.
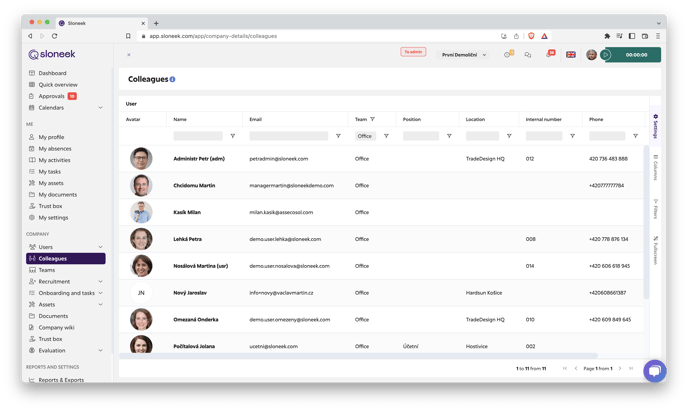
Colleagues and data export
You may also click on Colleagues in the menu and you will be presented an overview of all other users including the relevant data. From here, you can export the data to Excel or CSV simply by right-clicking in any of the table rows.
-
Visibility of modules
Do you need to hide some modules in your application that you don't use? Or make them visible again? This is how you do it. 👇Here you can either manage the individual users for whom you are going to activate or deactivate a specific module (by clicking on the eye icon in the column next to their name), or you can centrally switch the entire module off and on by clicking on the corresponding toggle.
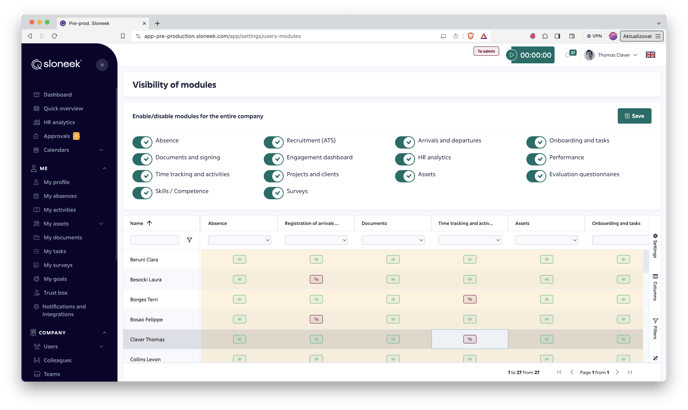
If users have some of the modules deactivated, admin or manager will not be able to effectively work with these modules. For instance, if user has deactivated the modul Onboarding and tasks, system will not allow to assign any checklists to this user. Similarly, user will not receive a notification to accept a new asset if they have got the modul Assets deactivated.
-
Custom user fields
All about how to create custom fields, how to edit them and more.
You can define custom fields to be displayed in the extended user card for the purposes of extended employee records.
You create and edit the custom fields in Users / Custom fields. You can also add fields directly in the user card.
Custom fields can be text, number, date, reminder, anniversary, single select and multiselect. In the case of a reminder, administrators will receive an email notification 7 days prior to the date of the reminder, which can be used for example to track the validity of legal training.You can categorize the custom field to group them as you need. The categories are then visible in the users profiles and it is easier to navigate to the specific types of fields.
In the user profile you can simply select the category you need or just view all. Also, if you add an URL link to the text field, it will create a link so that you can easily and quickly navigate to it.
IMPORTANT!
In case your custom fields are already defined and filled in, avoid changing its settings and type of field. If you do it, the data from the user profiles will disappear. So the suggestion is to always create new one with the correct settings and transfering the data from the old one. Our support team can always help you with transefring the data via import file.
Notifications
Both Reminders and Birthdays are displayed in the Calendar and Reports (Reports / Other / Reminders). In the reports, reminders are coloured according to the approaching expiry date.
-
Phase of the employment / collaboration cycle (journey)
Get an overview of your employees' and co-workers' journey stages.You can edit the phases of the employment/collaboration cycle (path) on the User card / Basic and Work Data tab.
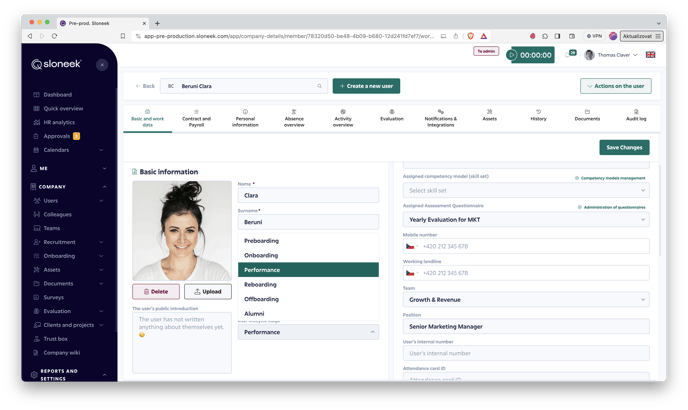
You can choose from Preboarding, Onboarding, Performance, Reboarding, Offboarding and Alumni.
-
- Preboarding - the phase between accepting an offer and the employee's first day. It's a crucial time to set expectations and start building relationships.
- Onboarding - the phase beginning on the first day of a new colleague. Onboarding often includes an adjustment period, which can last up to 6 months.
- Performance - the phase when the new colleague is expected to perform at full capacity.
- Reboarding - the phase marking the preparation for the new role. From the perspective of HR and the colleague, it means a lot. There is nothing worse than coming into a new role unprepared.
- Offboarding - the phase of separation from the company. Order without chaos contributes to a calm and smooth handover.
- Alumni - brings former colleagues together. It can come in handy on occasions when you want to share your achievements with former colleagues as well. But also in case you want to approach one of them for a new collaboration.
-
-
How to import users in bulk?
Sloneek allows bulk import of users in three ways: from Microsoft Active Directory, from Google Workspace, but also directly from Excel.
Microsoft Active Directory
If you have a database of employees in your Microsoft account, use this tutorial to guide you through the bulk import and activation of users.
Google Workspace
If you prefer Google and keep your people database there, follow this tutorial.
Excel spreadsheet
The final option to perform a bulk import of users is directly from your Excel database. While you can handle the first two options yourself, this option will require assistance from the Sloneek team.
Please contact your contact person who will send you the import spreadsheet and give you more information on the process. -
Meal vouchers / meal voucher lump sums - recording and setting up
Setting up the calculation and reporting of the meal benefit entitlement.
Individualised settings are made on User card in the tab Contract and Payroll.
Reporting for meal ticket issuance can be found in Reports / Other. Here you have 2 possible reporting views: by working time or by attendance. If you opt for a first option, the system will check if your employee was or was not absent on their working days and based on that will determine whether they are eligible to get meal vouchers. On the contrary, in the reporting view by attendance, the system will look into an employee's real attendance at work and will calculate the exact amount of meal vouchers available based on that metric.
See how to set up Working hours and Attendence module.
You work with the report in the same way as with any other. You set the periods for which meal vouchers should be issued.
You automatically have meal ticket management turned on.
You can turn the display of the meal voucher management off/on in Company settings / Application Settings. Here you click "Hide meal vouchers"


