To make it easier for us to import your users into the system, we've put together a bulletproof list of steps and recommendations (read requests) on how you should fill out the import template correctly.
To create a user in the application, we need to know a few details that are mandatory fields to fill in the template (columns are marked in orange):
- First name
- Last name
- Is admin?
- Shall we activate this user?
- Has GDPR consent been given?
- Is permanent residence same as contact address?
All other details are completely optional and it's up to you what you want to have filled in for your users.
Should you not fill in the mandatory columns, the following will apply when importing:
- Is admin? - we automatically set that user is not admin
- Shall we activate this user? - we automatically set the user to be inactive
- Has GDPR consent been given? - we automatically set that consent is missing
- Are permanent and contact address the same? - we set they are the same
Each email must be unique. So it is not possible, for example, to create two users for the same email. Also watch out for typos and diacritics in email addresses.
TIP: If you are using one email for multiple people, you can try using fake aliases. Did you know that messages and notifications for the thomas+thomas@sloneek.com or thomas+zlutejablicko@sloneek.com emails will still go to Thomas's original thomas@sloneek.com email address? 👀
Fill in the table as shown in the first row (or rather row 3). When you click in a cell, you will also automatically see the instructions. For a successful import, the date must be in the correct format (06/22/2023) or where you are selecting between 0 and 1, only 0 and 1 are actually typed in (and not, for example, YES and NO). 😊
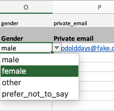
Please also respect the lower and upper case letters in the columns where you are selecting from the menu. E.g. for gender you must fill in "male", not "Male" etc.
Do not change the order of the columns or delete any columns! If you don't need them, leave them blank. The same applies to the sheets. Their names and order must remain the same. Do not add your own sheets, we will not be able to import the file.
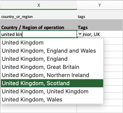
For the Country / Region of operation column, you must select countries and regions from the available selection of countries and regions. Just click in the cell and select for example United Kingdom, Scotland and then copy to other users.
Please note: If you type for example Great Britain as the country of operation in the row instead, we will not be able to import this. The countries and regions are based on our database and their exact form is specified on the second tab called Data. Do not change the information on this tab in any way!
A similar thing applies for the Gender column. Click in the cell and select from four options: male, female, other, prefer_not_to_say. Alternatively, copy in bulk to other users. Again, though, the data in the cells must match these four options. For example, if you enter Male instead of male (or just M), we can't import the data without difficulty. Same applies for the column Employment state - (life cycle).
Watch out for extra spaces and "invisible" characters in empty cells. We've been flooded a few times by an inadvertently "filled" line with five spaces etc. 🙃
Are you missing any information in your user tab in Sloneek? Add it using custom user fields!
Custom user fields are designed specifically for capturing additional information. In the import template, you'll find these fields at the very end. You can add as many as you need, following the structure of the template. Just name each custom field in the top row (for example, Number of fingers, Nickname, etc.), and enter the corresponding values in the cells below.
Important:
Before importing, you must first create the custom field directly in the Sloneek app and select the appropriate type (e.g., text, number, multiselect, etc.). Once the field exists in your account, we’ll be able to import the data correctly.
Not sure how to create a custom field? You’ll find all the necessary information in this article.
For the work contract type and salary, you must fill in at least the start of validity of this work contract or salary. In the case of an indefinite period, leave column V (Valid to) blank.
And that's it! You have filled in the import template perfectly. 💪 Thank you!


0 comments
Please sign in to leave a comment.