User management
-
User List
This is your list of all active and inactive users.
In the basic view, only the following user information is displayed: avatar, first name, last name, status (active/inactive), roles, team, and email.
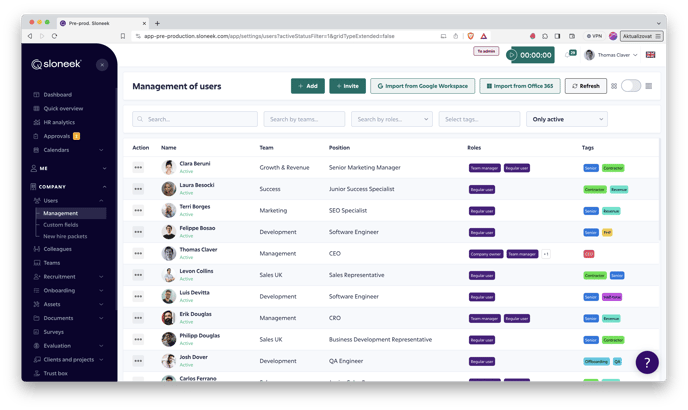
The Action button
 will take you to edit, delete, (de)activate a user or reset a password. Password reset can be done by the user himself.
If you need to export data from user folders, use the User Report.
-
User folder
Overview of all the information about a specific user.👇
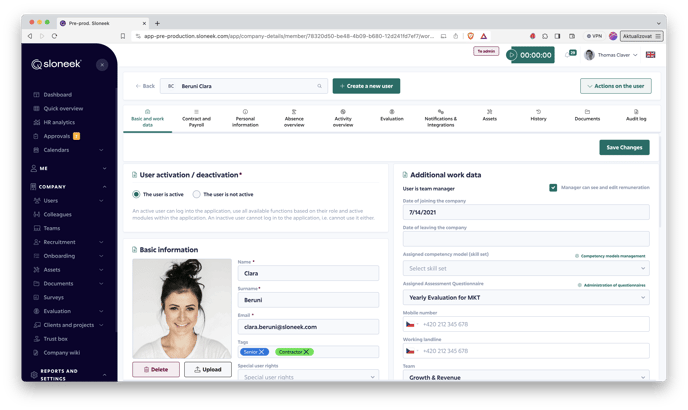
Each user has a profile, which can be flexibly extended via the Custom Fields. The user management is only accessible to users with the Administrator and Account owner roles.
 Basic and Work data tab
Basic user information including team assignments, roles, notes, and Custom Fields to expand the recorded information across all users. For more information on setting up and editing Custom Fields, click here.
We also recommend adding tags to users in this section to help you filter users by logical groups more easily. An example of such a label could be Maternity leave or Contractor.
If the user's public medallion is filled in, the text will be displayed within the information in the Colleagues section and also in a tab within the organizational structure. Every user can also upload their profile photo. This picture will be visible throughout the app.
Contract and Payroll tabDetails of working time, salary, deductions and bonus settings. In this tab, set the conditions for meal vouchers and meal voucher lump sums.
Evaluation tabEverything related to evaluation, skills assessment and user performance can be found under the Evaluation tab.
Personal information tabA detailed overview of the personal data required to manage the user.
Regular users can edit the Personal Information section themselves to partially reduce the administrative burden on their HR departments. Users can e.g. edit their address or bank account details. Any such change will come to the administrators for approval (who can also find it in the Approvals / Change of personal data section).
Absence and activities tabsOverview and setting of absences and activities for a specific user.
History tab (user's time line)All the important actions of the user, carefully sorted in a timeline.This overview will be especially useful when a new leader comes to the team who doesn't have much historical overview of his people.
We work with the following event logs:- Date of hire
- Change in base salary / bonus (contractors)
- Added bonus
- Completed appraisal
- Change of team
- Change of position
- Change of work location
- Mentions in Kudos
- Date of departure
Interface settings tabSetting module visibility, managing alerts (notifications), an overview of Google and Microsoft integrations and a detailed audit log, all for a specific user.
Documents and Tools tabsThe tabs are displayed when the modules are activated. They contain the documents and tools assigned to the user.
-
Activating and deactivating a user
You can activate/deactivate the user in the User Folder on the tab Basic and Work data, where you just check the box "User is active / User is inactive". Alternatively, you can activate a user directly from the User List by clicking the three dots next to their name and selecting Activate.
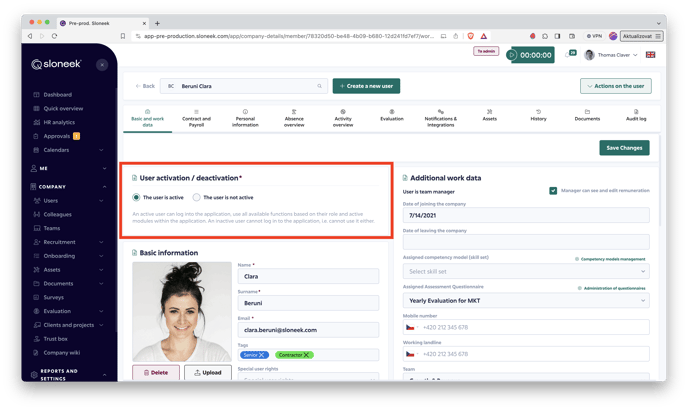
Before actually activating a user, make sure that the email address assigned to each user is functional (active). This is especially important for company domains.
In case you activate a user who does not have an active email assigned to them (typically before joining the company), they will be automatically blacklisted in the Amazon service we use for the functioning of Sloneek. This is due to the mail server trying to deliver messages to a non-existent email.
-
Create a new user (employee)
It is very easy to create (enter) a new user (employee). In the Users / Management section, click the Add button and create a user with the required details.
Alternatively, just send the user a link to "self-create" an account in Sloneek. In the Users / Management section, click on the Invite button and copy the link that the system will generate. Send the link to the user and then just check the data and activate the user.If you would like to add more users in bulk, please see the options for importing them to the system in this article.
-
Mood meter - company mood
Every company can benefit from continuous mood detection through a simple measurement mechanism.
All users can then express in what mood they are currently in or how they perceive their work today.
Switching off/on is done in Settings / Other / Application Settings.
Data collection is COMPLETELY ANONYMOUS, Sloneek does not store or display individualized "voting" data.
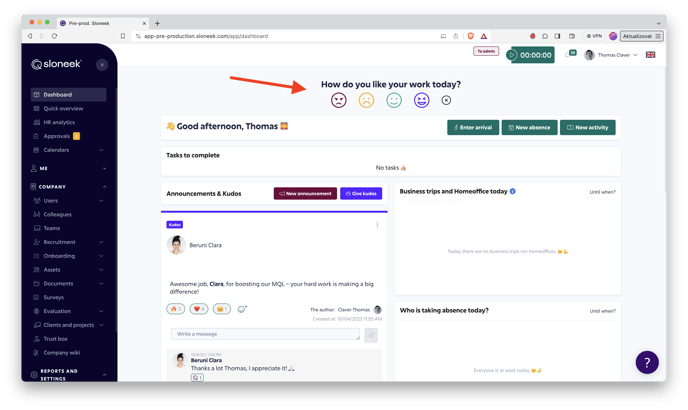
The evaluation is then simply done in Reports.
-
Sending a new password
The Administrator and Account Owner roles have the ability to send a link to the selected user to change their password.
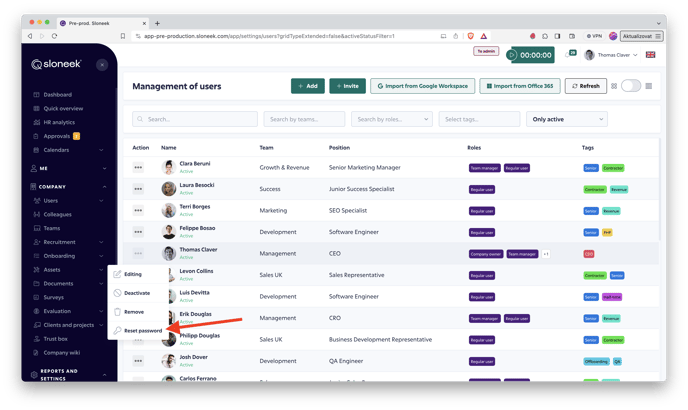
In the list of users, click
 and select Reset Password.
The user can also change the password himself. Instructions can be found here.
The user must be ACTIVATED to be able to change the password.
-
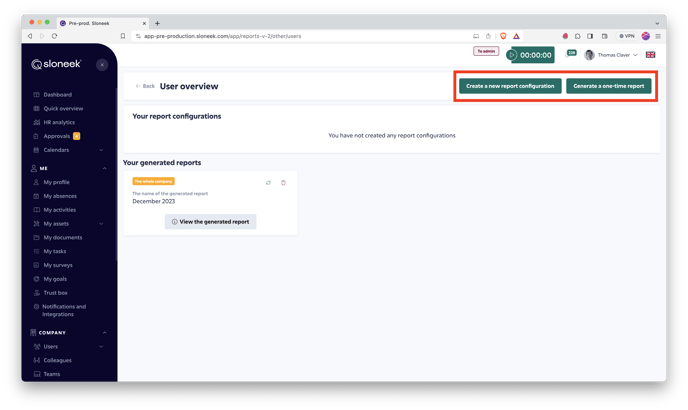
User (employee) overview report and data export
In addition to the standard reports used for payroll processing or as overview sheets, Sloneek also offers a comprehensive user overview.
You can find this report in the Reports and Settings / Reports section under the Other tab. As with the other reports, you have the option to create a configuration from which you can quickly generate the same report again in the future. The other option is to have a one-time report generated:
Then just choose which data you want to include in the report. You can choose from three main areas, depending on how you know them from the user folders:
- basic and work data
- contract and payroll
- personal information
First and last name are mandatory data that are always automatically included in the report. You do not need to search for them in the menu.
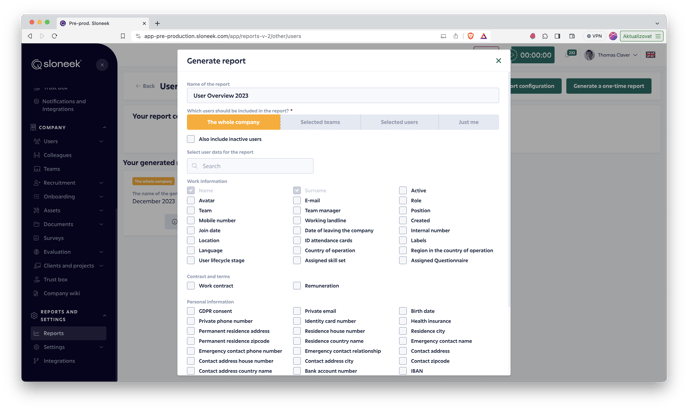
Once you have set the parameters, all you have to do is generate the report. Again, you will receive a notification when the report generation is complete.
You can further modify the finished report, filter within it or set up your own views. The mechanism is the same as for the other reports.
Of course, you can export the user (employee) report as CSV or XSLX. -
International team/company structure
If you have employees in different countries, it is often necessary to take into account the public holidays in each of the countries in which the employees work when planning absences or calculating the work fund. At Sloneek, this is easy. 👇
Case
The team includes employees from the United Kingdom, Sweden and Portugal. When planning holidays, the team manager needs to take into account when these employees have public holidays in their countries.
How to do it in 2 steps?
In each user's folder, you will find the Country of operation and Region in the country of operation rows. For an employee who works from the United Kingdom, you will assign the United Kingdom as the country of operation, for an employee from Portugal you will assign Portugal. You also have the option of assigning a country of operation identical to the company's country.
Please note: This action can only be performed by administrators or the account owner. More about user roles here.
Once you assign a user to a country, the system automatically detects their public holidays and calculates the work fund for that month and takes absences into account.
In the second step, the team manager can then go to the absence calendar and quickly filter out the employees they need to see. For each user, the country code is shown in parentheses. When the manager includes a user who works in the UK in the filter, the system will automatically display UK public holidays in the calendar. Similarly, if you filter e.g. your Spanish colleague, you will see Spanish public holidays (reflecting regions).
At the same time, however, you can display the public holidays of the company's "home" country, as set up when the account was created in Sloneek. This is done by using the checkbox above the calendar.In practice, the manager can see the public holidays of the United Kingdom, where their company is based, and the public holidays of his Spanish or Swedish subordinate in the calendar. This will give him a perfect picture of how to plan everything.
What about the reports?
The moment you assign a user's country of work in their card, the system automatically pulls the public holidays of that country from the database and calculates the user's work fund for a given month based on that. This will of course also be reflected in all reports, where the net working fund for the month will be "adjusted" from public holidays.
If the user has a public holiday in their country in a given month, this information will also be reflected in the absence reports. In the Combined report, the absences will be equal to the number of hours the user should normally work on that day (for an 8-hour working day, the absences will show 8). On the other hand, in the Monthly report of hours worked or in the Working hours report, the value 0 will be displayed for a particular day.


