What the Administrator needs to know
-
Setting user absences
Individual and bulk setting of absence drawing options.👇
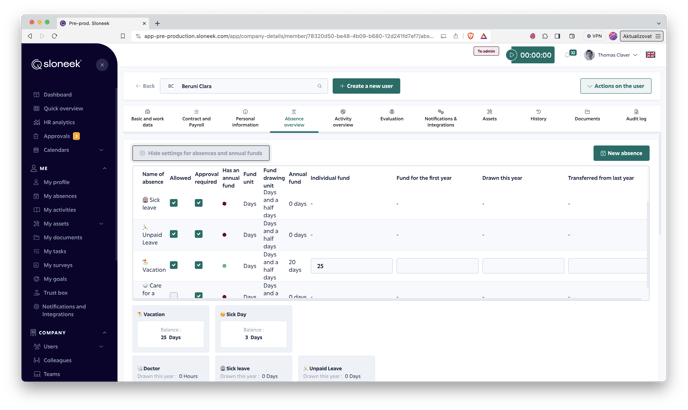
You can set up absence events for each user in Users / Management / User folder (Absence overview tab). Click on
/show%20absence%20settings.png?width=200&name=show%20absence%20settings.png) .
.The menu will automatically display all event dials that are active. You must also set whether the event is subject to approval by its manager. This can be set by clicking on the check box in the next column called Approval required.
This setting can also be done in bulk ⬇️
Bulk balance adjustments
Bulk balance adjustments can be made in Company Settings / Bulk Settings of absences.

Explanation of individual terms
- Fund size - is defined directly in the dial. From there, it can be changed on a global level for all users who have this absence event enabled for use.
CAUTION: You cannot change the size of a fund for an absence that has already been created. This would also change the historical data in reports and other places in the application. You can read how to proceed in this case here.
-
Individual fund - Only if the event has a fund. If a value is set here, the user's entitlement is not governed by the value in the dial, but the dial entitlement is overwritten by that value. Typically this is a situation where some users have 5 more vacation days than others. In this case, if the definition in the Vacation dial is 20, the Individual Pool will be equal to 25 for people with a higher pool.
-
Fund for this year - Again, only if the event has a fund. In a situation where an employee starts during the year, they are not entitled to the entire leave pool (usually not even sick days, sick hours, etc.) but only a pro-rated portion. This needs to be calculated in the payroll system and then entered here.
- Exhausted - This value is editable for all event types (with and without pool) and indicates how many units from the pool the user has exhausted this year. This is a setting, not a report! Thus, here you are determining how many units to have depleted beyond the events that are entered in the absence event calendar.
Example: in a situation where you as a company have joined Sloneek during the year, and your employees have already exhausted some events by that time. In this case, you have two options. Either you enter all the events they have exhausted via the calendar (i.e. de facto enter the events backwards), or you are content with just entering in this column how much they have already exhausted. The first option is laborious, but gives you information about all the events being used up in a yearly view, the second option is fast, but you have to take into account that in the first part of the year, when you as a company have not used Sloneeka yet, the events are not in the calendar. We almost always recommend the faster option to our customers.
- Transferred from last year - At the end of the year, Sloneek carries over unused units to the next year. All units that have not been used up and also have a fund, and at the same time the option "Unused units carry over to next year" is marked in the dial settings, will be entered in this column. So if you as a company are accessing Sloneek, and your employees at that time still have some unused leave from last year, enter the value of that pool here.
How do I enter an absence for another user as an administrator or team manager?
If you need to enter a vacation or any other absence for another user as an administrator, please follow these steps:
- From your desktop, the Absence Calendar, or a specific user's tab, click the New Absence button.
- From the very top of the dialog box, slide the radio button to the right to
to the Another user option. - Enter the absence for the user.
Transfers of year-end balances
At the end of the year, here's what happens to each individual user's absenteeism setup items:
-
Individual Fund - will remain the same. This is logical, moving to a new year does not affect the fact that a user has a different entitlement than defined in the codebook.
-
Fund for this year - in the new year will be entered here as zero. It was a fund for the first year only.
-
Exhausted - in the new year, zero is entered here. We're starting from zero to load absences.
-
Transferred from last year - If this is a fund event and the unspent balances are set to carry over to the new year, the number of units the user did not use last year will be entered here.
You can set up balances and entitlements clearly and in bulk on the Bulk Setup tab in Company settings / Bulk settings of absences. Check above.
-
Accruals for absences
Accruals for vacation or any other type od absence is a feature, thanks to which can employees earn their holidays (another absences types) as they work.
Accruals work like a 'bank'. Employee has to work in order to earn vacation fund. After they have accumulated vacation fund, they can withdraw it.
Let's have a look how and where to set up the Accruals!
It is available in Setttings/ Absences section.
Once you enter Accruals section, you can add a new one based on the location and choose what should be the periodicity. If you want the accruals to work for a specific user, you would just define their country of operation.
E.g. Giuseppe's country of operation is Italy, therefore I would add a new accruals policy for Italy to Vacation absence type and assign this absence type to him.
ATTENTION! You can only setup Accrual policies on the Vacation Event types with the “Fund”.
Each accrual policy will contain these parameters:
- Accrual Type
- Monthly
- the accrued time will be accumulating by this formula:
- Vacation fund for year / 12 (months) = X, and X will be accrued every month
- the accrued time will be accumulating by this formula:
- Twice a month
- the accrued time will be accumulating by this formula:
- Vacation fund for year / 24 (months*2) = X, and X will be accrued twice a month
- the accrued time will be accumulating by this formula:
- Weekly
- the accrued time will be accumulating by this formula:
- Vacation fund for year / 52 (Weeks) = X, and X will be accrued every week
- the accrued time will be accumulating by this formula:
- Monthly
Then you just set up absence types and allow user to use them, for more information how to do it please refer here.
- Accrual Type
-
Creating and setting the absence dials
In Company Settings / Absence events set the types of absences that should be available for your company.
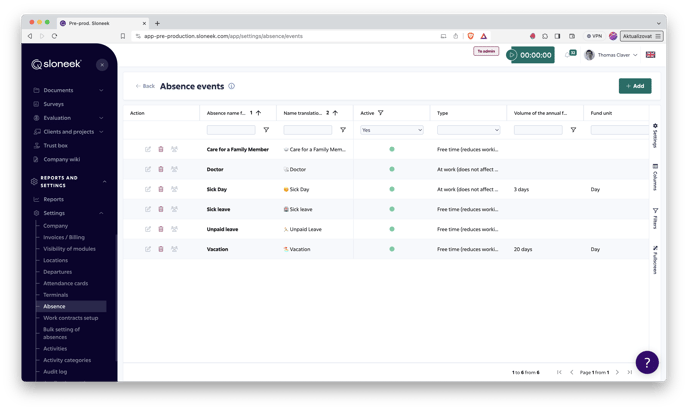
Creating and editing the dials
The screenshot above represents a table of all available absence events. From here, you can create a new dial by clicking the
 button on the top right or edit an existing dial by clicking the pencil icon in the corresponding absence row. Both the create and edit screens look virtually identical.
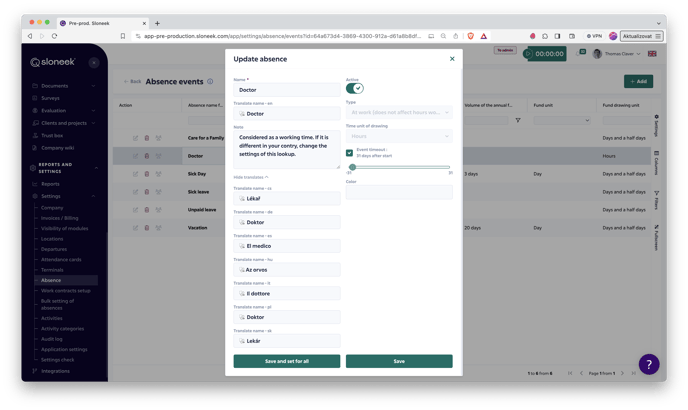
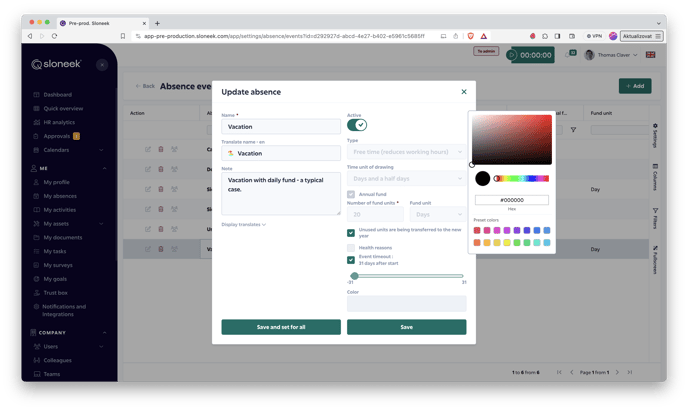
ATTENTION: For absences once created, you cannot change the time unit of use or the annual fund after saving. More information can be found in this article.
Absence dial parameters
-
Name (visible to administrators)
-
Translations visible to other users
-
Note (for administrators)
-
Type - Day off or At work
-
Free time = this event reduces the time worked. If a user enters such an event in the workday, his working time will be reduced by that.
-
At work = this type of event does not change the time worked. This is typically the case for a doctor's visit or sick hour, as this time is considered as worked time.
Please note: Absence and Arrivals and Departures are two separate modules. If an employee enters an absence of type At work (e.g. doctor) and you also record attendance using Arrivals and Departures, on the day the employee leaves for the doctor's appointment they should "clock-out". Similarly, when their return from the doctor, they again enter an arrival.
As a result, there will be no discrepancies in the reports for the balance as the balance is calculated purely on the basis of hours recorded by arrivals and departures. There is no need to enter anything for absences of the Free time type.
-
-
Unit of time
-
Days and half days
-
Days (only whole days are allowed, not half days)
-
Hours
-
-
Annual fund (yes/no)
-
Health reasons - Used to set up Sick or Care for a Family Member, where the event is written to the report including weekends and holidays (calendar days)
-
Number of fund units and fund unit
-
Unused units are carried over to the next year (yes/no)
-
Time limitation (yes / no) - determines the latest time the user can register or modify the event. Negative values mean how many days back (e.g. -3 means he can register up to 3 days back) or in advance (+3 means the event must be registered at least 3 days in advance) the event must be registered. In case of a value equal to zero, the event is registerable at the latest on the day the event starts, i.e. today.
You can set sick leave or Care for a Family Member as an event Free time, the time unit is Days and half-days. You tick Medical reasons.
An overview of the mechanisms for setting up and drawing absence events can be found under the link HERE.
Go to absence settings for users
 .
. -
-
Overview of absence event settings
An overview of the mechanism for drawing absences can be found here.
-
Working hours settings
Without assigned and active working hours, a user cannot draw absence events, record attendance or timetracking.You set the working hours in Settings / Work contracts setup.
Working hours Determines when the employee is scheduled to work. It can be defined either by a recurring weekly cycle which best represents the working hours of traditional office professions working Monday to Friday, or it can be defined for each specific day of the year. This yearly setting is suitable for defining the working time of employees with irregular working hours (e.g. working every Monday every even week) or for employees with very dynamic scheduling (e.g. medical professions).
Setting up the Working hours dial
In the section Settings / Work contracts setup, all available working time dials can be assigned to users. As a first step in configuring the Absence module, it is a good idea to go through the existing dials and possibly create your own if the dials supplied within the application do not suit you:
Click on the pencil icon next to the selected dial or click on the
 button to access the edit dial. Both options - creating a new dial or editing an existing one - look practically identical.
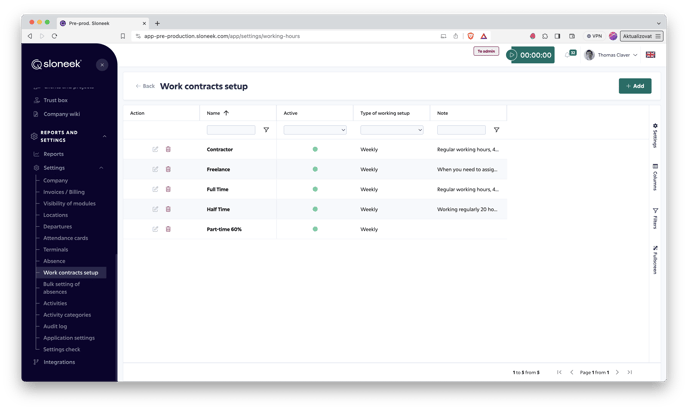
The top section of the Working time settings contains the basic settings - name, translations into world languages, switch between active / inactive events (inactive event cannot be drawn), color and type. The lower section is used for editing the working time itself. As we mentioned in the introduction, the Timesheet can be of two types - weekly or annual.
Setting weekly working time
Within it, it is possible to define which days of the week (Monday to Sunday) are considered as working days, as well as specific shift start and break times.
This type of working time is suitable for those employees who come to work regularly, and this regularity can be defined on a weekly cycle. Any other definition of working time requires the use of the second - annual - method.
In the second half of the screen "Setting weekly working hours" is the definition of specific times and working days. This can either be set directly on this screen, but since the table contains about twenty columns, it is more practical to zoom in to the full screen - by clicking on the icon
 next to the
  button. Clicking this button allows you to work on a large desktop.
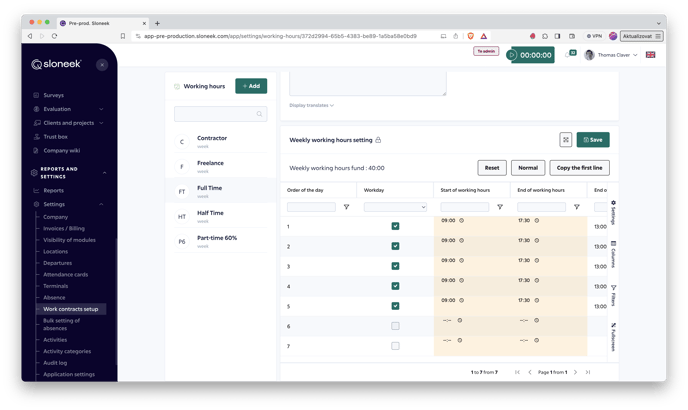
Here, go through all the columns and define the working hours. To simplify your work, there are quick actions on the top right
- RESET - Delete the entire table completely
- BASIC - Sets the most common working hours - Monday to Friday, 8 and a half hours including lunch
- COPY THE FIRST ROW - Takes the Monday setting, and copies it to all other rows
WARNING: Don't forget to save your work times!
Setting annual working hours
Annual timesheets use very similar principles to weekly timesheets. The essential difference is that there is no repetition as there is in the weekly time. In an annual definition, you simply define a specific working time for each specific day of the year. You can therefore have completely individualised working hours that already take into account public holidays and weekends.
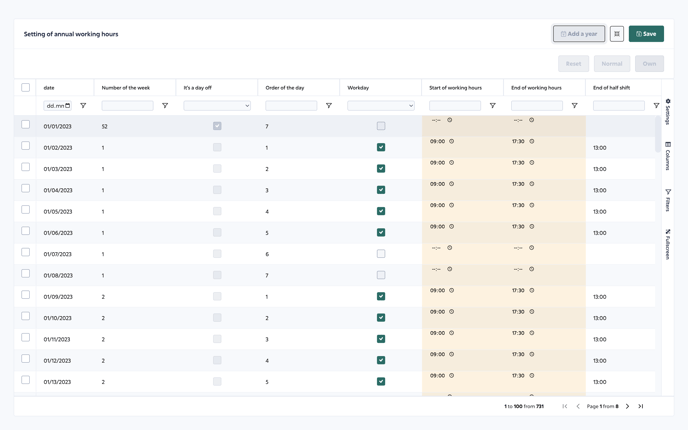
A significant difference from the weekly cycle is how the application accounts for public holidays. On a weekly cycle, it is of course not clear whether there will be a public holiday on a particular day. In the case of a user who has a weekly cycle, works Monday through Friday, and a public holiday occurs on a Wednesday, for example, even if the user has Wednesdays as working days, Sloneek will take the Wednesday with the public holiday as a day of rest in the weekly definition. However, in the case of the yearly definition, the scheduler who defines the working hours sees that there is a public holiday on that particular day (in our case Wednesday), and still schedules a shift for that day, the user should simply have it!
To edit the working times even in the case of the annual definition, click on the "Zoom to full screen"
 next to the "Save"
 . In this large area, set specific shift times for each individual day.
Here you have the option to filter the days by different criteria, for example you can filter only Mondays (it is the day with the serial number 1), or all even weeks, etc. Once you have filtered the days you want to bulk set, select them by clicking on the checkboxes on the left, and edit the days so selected by clicking on the CUSTOM button at the top right. A window will open in which you set all the times, and click on the SAVE to overwrite these set times in all selected days.
De facto, you can very quickly set up relatively more frequent recurring patterns for several days at once. This can save you a huge amount of time because you won't have to go through all the days one by one and set them up one by one.
You now have Working Hours dials that you can set up for specific users of the app.
Tip: You may have also noticed a type of cooperation called Empty. You can use this form of contract for those users who are not employees and do not have standard working hours, do not take absences and only track how much time they actually work through activities.
Assigning working time to a user
You can assign working hours to a specific user on the User Folder, Contract and Payroll. You can set the duration to either a definite or indefinite period.
What to watch out for:
- Without assigned and active work time, a user cannot draw absence events, record attendance, and timetracking!
- Each user can only be assigned one currently valid working hours. Therefore, it is not possible to assign a user two simultaneous working hours. But do not worry, we have got our tricks so let us know if you need in this matter.
-
Monthly email overview for Admins
In relation to individual user roles, Sloneek sends out overview statements Monthly overview for the user role User, Weekly overview for the user role Manager and Monthly overview for the user role Admin.
Monthly overview for the user role Admin
The report is sent out in the morning on the first of the month. In the overview you will find:
-
Download the monthly reports - Link to generate the report. Included is Information on who has no closed absences in the previous month (List of unapproved events - user, event, start and end)
-
In relation to the activated modules, the information for Attendance a Time tracking (Activities).
- Added a new notification type reminder to the Anniversary and Date email notifications. The notification is sent 7 days before the date that is specified in the user's profile.
Detailed content of the summaries, including the option to set up all notifications, can be found here.
You can turn off/on the Sloneek DIGEST reports on the Notifications / Sloneek tab. You can find it under ME / My profile.
-
-
Transfers of year-end balances
What`s happening with your absence balances when entering a New year.
At the end of the year, here's what happens to each individual user's absenteeism setup items:
-
Individual Fund - will remain the same. This is logical, moving to a new year does not affect the fact that a user has a different entitlement than defined in the codebook.
-
Fund for this year - in the new year will be entered here as zero. It was a fund for the given year only.
-
Exhausted - in the new year, zero is entered here. We're starting from zero to load absences.
-
Transferred from last year - If this is a fund event and the unspent balances are set to carry over to the new year, the number of units the user did not use last year will be entered here.
You can set up balances and entitlements clearly and in bulk on the Bulk Setup tab in Company settings / Bulk settings of absences.
-